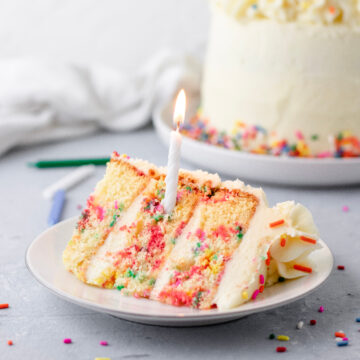
This homemade funfetti layer cake recipe is the perfect birthday cake for any age! It has moist vanilla cake layers that are buttery and filled with rainbow sprinkles. Plus, it's frosted with a vanilla buttercream frosting and extra sprinkles.

This homemade funfetti cake has plenty of confetti sprinkles folded into the cake batter and even more on the buttercream.
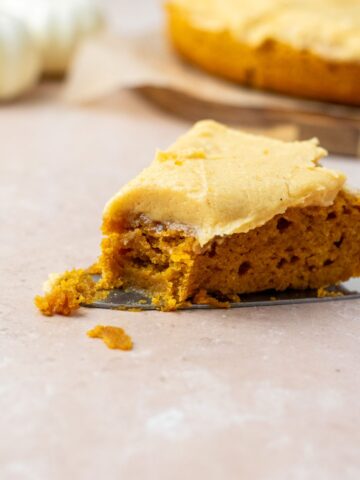
In my opinion, the best funfetti cake is filled with lots of sprinkles and covered in a classic vanilla frosting. This is a must-bake for any and all vanilla dessert lovers!
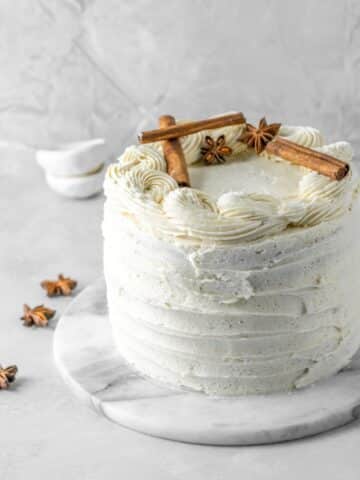
Looking for more birthday cake ideas? Then check out these: the best chocolate cake, Reese's peanut butter cake, and banana split cake.
Jump to:

Why You'll Love This Cake
- It has 3 funfetti cake layers.
- The cake is soft, tender, and so fluffy.
- The vanilla buttercream is smooth and creamy.
- It's better than any boxed cake mix you could make.
- It's perfect to make for any special occasions!
If you enjoy ice cream with your cake, then this no churn funfetti ice cream recipe is perfect to pair with this birthday cake.
Ingredients Needed
Here are some notes on the ingredients we'll be using. For the full list of ingredients, look at the recipe card below.
- Flour: I used all-purpose flour.
- Unsalted Butter: Butter is used in both the cake and vanilla buttercream. This ingredient does need to be at room temperature.
- Eggs: 3 large eggs are used to create structure within the cake. This also needs to be at room temperature.
- Vanilla Extract: Please use real vanilla, not imitation. If desired, you could also use clear vanilla extract.
- Milk: I used 2% milk.
- Sprinkles: Use rainbow jimmies (long and skinny), not nonpareil sprinkles (tiny balls). I like Wilton's or Betty Crocker's rainbow sprinkles.
- Heavy Whipping Cream: This adds creaminess to the frosting. You could also use heavy cream or milk.

Instructions
Here are the step by step instructions on how to make this funfetti cake recipe.
Step 1: Dry ingredients. In a large bowl, whisk together the flour, baking powder, baking soda, and salt until combined. Set aside.
Step 2: Cream the butter. In the bowl of a stand mixer using the paddle attachment, cream together the butter and sugar on high speed until light and creamy.
Step 3: Wet ingredients. Reduce the speed to medium and add the eggs, one at a time, beating well after each addition. Then mix in the vanilla extract.
Step 4: Combine the ingredients. On low speed alternate adding the flour mixture and milk, starting and ending with the flour (flour, milk, flour) and mixing just until combined.
Remove the bowl from the stand and gently fold in the sprinkles using a rubber spatula.
Step 5: Bake the cake. Divide the cake batter amongst the three prepared cake pans and bake for 23-28 minutes.
Let the cake cool in the pan for 25 minutes before removing and placing them on a wire rack to cool completely.

Vanilla Buttercream Frosting
In a bowl of an electric mixer using the paddle attachment again, beat the butter on high speed until smooth.
Add the powdered sugar, heavy whipping cream, and vanilla extract and mix on low speed until combined.
Then beat on high for an additional 1-2 minutes until smooth and creamy.
Assemble The Cake
Once the cake layers are completely cool and your buttercream has been made, it's time to assemble and decorate your confetti cake.
Place one cake layer on a cake stand or serving plate and spread about ⅔ cup of frosting. Repeat with the second cake layer.
Top the cake with the final layer and spread on about ¼ cup of frosting. Frost and smooth the sides of the cake with a thin crumb coat (I used my offset spatula and cake scraper).
Place the entire cake in the freezer for 10 minutes to chill. Then, finish frosting and decorating. If desired, add even more colorful sprinkles to the frosted cake before slicing and serving.
Storage Tips
Keep any leftover cake slices in an airtight container in the refrigerator for up to 5 days.
You could also wrap the individual pieces of cake in plastic wrap before placing it into the refrigerator. This helps to keep the cake moist.
Expert Baking Tips
- Cake Pans: This recipe calls for three 6-inch cake pans. Line each pan with parchment paper and nonstick cooking spray.
- Measuring Flour: To help ensure you don’t add extra flour, follow these three simple steps: 1) Fluff up the flour using a fork. 2) Spoon the flour into your measuring cup. 3) Scrape a knife across the top of the measuring cup to level out the flour.
- Room Temperature Ingredients: Any ingredient that needs to be at room temperature should be taken out of the refrigerator at least 1 hour before you want to bake. Do not skip this step! It's super important so that the ingredients can incorporate properly.
- Dividing the Batter: To make sure I evenly divide up the batter amongst the cake pans I use a ½ measuring cup to scoop the batter into each pan. I count as I go and then switch to a tablespoon as I get less and less batter.
- Crumb Coat: This is where we add a thin layer of frosting on the cake in order to catch the crumbs and keeps them secure. You’ll want to chill the cake in the refrigerator or freezer for 10 minutes after the crumb coat has been put on before the final frosting layer.
- Cake Decorating Tools: I like to use a turntable, bench scraper, and an icing spatula to help assist me when assembling a layer cake.
- Make Ahead Instructions: This cake recipe is great to make ahead of time. Simply bake the cake layers the day before, wrap them in plastic wrap, and leave them on the counter at room temperature overnight. Frost and decorate the next day.
Recipe FAQs
Rainbow jimmies, which are the long and skinny sprinkles, are what you should use in this cake. The nonpareil sprinkles, which are the tiny balls, tend to bleed out their colors in the cake batter.
Traditionally, funfetti cake is a white cake that is buttery in flavor and very vanilla-forward. I chose a yellow cake for this recipe, so in my opinion you can use either a white or yellow cake batter and it'll still be delicious.
Absolutely! You could go with a cream cheese frosting, strawberry, or even chocolate. The choice is up to you!
You could also use two 8-inch cake pans or two 9-inch cake pans instead. Just note that the bake time may be different.

If you made this recipe, please leave a comment and star rating below. I love hearing from you! Also, please tag me on Instagram and check out my Pinterest for even more recipe ideas.
It brings me so much joy to see you make my recipes. 🙂
Happy Baking!
More Cake Recipes

📖 Recipe
Homemade Funfetti Layer Cake
Equipment
- 3 6-Inch Cake Pans
- Mixing Bowls
- Silicone Spatula
- Electric Stand Mixer
- Cake Decorating Tools
Ingredients:
Funfetti Cake
- 2 cups all-purpose flour
- 2 teaspoons baking powder
- ½ teaspoon baking soda
- ¼ teaspoon salt
- ¾ cup unsalted butter (1 ½ sticks), room temperature
- 1 ¼ cups sugar
- 3 large eggs, room temperature
- 2 teaspoons vanilla extract
- 1 cup milk, room temperature
- ½ cup rainbow sprinkles
Vanilla Buttercream
- 1 ½ cups unsalted butter (3 sticks), room temperature
- 5 cups powdered sugar
- ¼ cup heavy whipping cream or heavy cream
- 3 teaspoons vanilla extract
Instructions:
- Preheat the oven to 350 degrees and line three 6-inch cake pans with parchment paper then nonstick spray. Set aside.
Funfetti Cake
- In a large bowl, whisk together the flour, baking powder, baking soda, and salt until combined. Set aside.
- In the bowl of an electric stand mixer using the paddle attachment, cream together the butter and sugar on high speed until light and creamy (2-3 minutes). Scrape down the sides of the bowl as needed. Then reduce the speed to medium and add the eggs, one at a time, beating well after each addition. Then add the vanilla extract.
- Reduce the mixer speed to low and alternately add the flour mixture and milk, starting and ending with the flour (flour, milk, flour) and mixing just until combined. The batter will be smooth and slightly thick (be careful not to overmix!). Remove the bowl from the stand and fold in the rainbow sprinkles using a rubber spatula.
- Divide the batter amongst the three prepared cake pans and bake for 23-28 minutes, or until a toothpick inserted into the middle of the cakes come out clean. Let the cake cool in the pan for 25 minutes before removing and placing them on a wire rack to cool completely.
Vanilla Buttercream
- In the bowl of an electric stand mixer using the paddle attachment, beat together the butter on med-high speed until light and creamy (2-3 minutes). Add the powdered sugar, heavy whipping cream, and vanilla extract and mix on low speed until combined. Then increase the speed to high and beat until light and fluffy (about 2 minutes).
Assemble
- If needed, use a serrated knife to level off the tops of each cake layer to create a flat surface. Place one cake layer on a cake stand or plate and spread about ⅔ cup of frosting. Repeat with the second layer. Top the cake with the last layer and spread on about ¼ cup of frosting.
- Frost and smooth the outside of the cake with a thin crumb coat. Place the entire cake in the refrigerator or freezer for 10 minutes to chill.
- Remove the cake from the refrigerator and finish frosting with the remaining buttercream. Cover the sides and top of the cake again (use a cake scraper for a smooth finish if desired). Add additional sprinkles to the sides and top of the cake.
- Keep any leftover cake slices in an airtight container in the refrigerator for up to 5 days.
Notes:
- Cake Pans: This recipe calls for three 6-inch cake pans. Line each pan with parchment paper and nonstick cooking spray.
- Measuring Flour: To help ensure you don’t add extra flour, follow these three simple steps: 1) Fluff up the flour using a fork. 2) Spoon the flour into your measuring cup. 3) Scrape a knife across the top of the measuring cup to level out the flour.
- Room Temperature Ingredients: Any ingredient that needs to be at room temperature should be taken out of the refrigerator at least 1 hour before you want to bake. Do not skip this step! It's super important so that the ingredients can incorporate properly.
- Dividing the Batter: To make sure I evenly divide up the batter amongst the cake pans I use a ½ measuring cup to scoop the batter into each pan. I count as I go and then switch to a tablespoon as I get less and less batter.
- Crumb Coat: This is where we add a thin layer of frosting on the cake in order to catch the crumbs and keeps them secure. You’ll want to chill the cake in the refrigerator or freezer for 10 minutes after the crumb coat has been put on before the final frosting layer.
- Cake Decorating Tools: I like to use a turntable, bench scraper, and an icing spatula to help assist me when assembling a layer cake.
- Make Ahead Instructions: This cake recipe is great to make ahead of time. Simply bake the cake layers the day before, wrap them in plastic wrap, and leave them on the counter at room temperature overnight. Frost and decorate the next day.
Nutrition
Recipe originally published in March of 2021.


Such a simple and easy funfetti cake recipe! The kids really enjoy it and so do we!