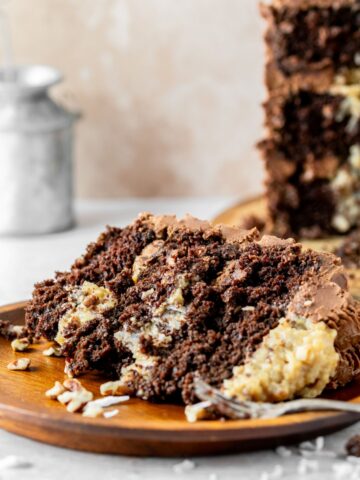
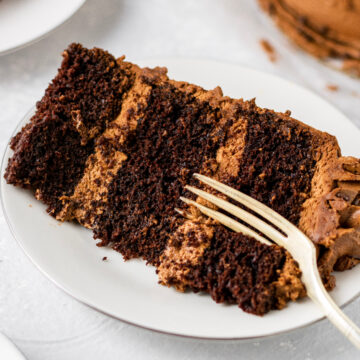
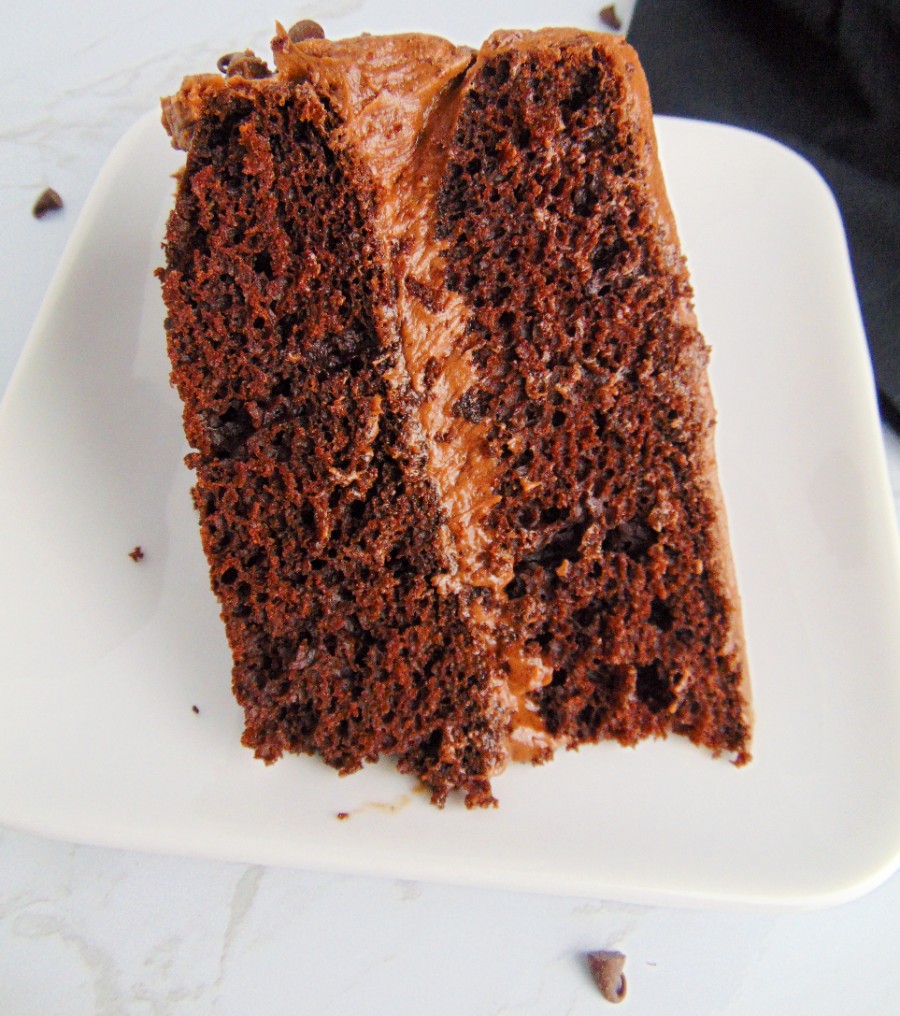
Chocolate lovers will unite over this most amazing chocolate cake! It's decadent, rich, and has the best chocolate flavor out of any chocolate cake I've ever had. It will be your next go-to chocolate cake recipe for sure!

Nothing beats the incredible flavors of a classic chocolate cake, am I right?
I'm talking about the one that is perfectly chocolatey, has a moist and soft texture, and an amazing chocolate buttercream to accompany it.
Well, this amazing chocolate cake recipe is the best chocolate cake I have ever tasted (and I'm very picky about my chocolate!). This chocolate cake is also the base of my Reese's Peanut Butter Cake. At this point, it's my go-to recipe if I'm really craving chocolate and I hope it will be yours too!
The cake is delicate, not dense, and the chocolate buttercream adds a nice smooth and creamy texture, along with flavor.
This is a must-bake cake recipe for any birthday, graduation, or anniversary. Trust me, you won't regret it!
Jump to:

Why You'll Love This Cake
- It's so simple and easy to make.
- The chocolate flavor is rich, decadent, and intense.
- It's incredibly moist, soft, and tender.
- The chocolate buttercream is so creamy.
- No mixer needed!
Don't you love it when you have recipes where you don't need to pull out your heavy stand mixer? Don't get me wrong, I love my mixer, but sometimes it's nice not to have to use it every so often. For this chocolate cake, your mixer is not needed.
Just two mixing bowls and a whisk is all you need to quickly whip up this cake. That also means fewer dishes. Yay!
Part of what makes a chocolate cake so moist is because of these three ingredients: warm water, milk, and oil. Using a combination of those ingredients will create a super moist and soft cake, which is exactly what we want.

Ingredients Needed
Super simple pantry ingredients is all you need to make this delicious chocolate cake!
- All-Purpose Flour: Adds structure and stability.
- Cocoa Powder: I recommend Hershey's natural unsweetened cocoa powder (not sponsored). Make sure to sift the cocoa powder.
- Sugar: Adds sweetness
- Baking Soda & Baking Powder: Both help the cake to rise when baking.
- Salt: Enhances all of the other flavors.
- Warm Water: Adds moisture to the cake
- Milk: I used 2%. This also adds moisture and contributes to a soft cake.
- Eggs: Two large eggs help to bind all of the ingredients together.
- Vegetable Oil: You can also use canola oil.
- Vanilla Extract: Adds flavor.
- Unsalted Butter: Helps to stabilize the chocolate buttercream.
- Powdered Sugar: Used to sweeten and thicken the frosting.
- Heavy Cream: Used to whip up and create a light and creamy buttercream. If you don't have heavy cream, you could use whole milk instead.

Ingredients
I made this cake using three 6-inch cake pans, but you can also use two 8-inch or two 9-inch cake pans.
- Dry Ingredients: Whisk together the flour, cocoa powder, sugar, baking soda, baking powder, and salt in a large bowl.
- Wet Ingredients: In a medium-sized mixing bowl, whisk together the warm water, milk, eggs, vegetable oil, and vanilla extract until combined.
- Combine Ingredients: Slowly add the wet ingredients into the dry, whisking until a wet batter forms.
- Bake: Pour the batter evenly between your prepared cake pans and bake for 32-35 minutes. Allow the cakes to cool completely before frosting.
- Chocolate Buttercream: In the bowl of an electric stand mixer with the paddle attachment, beat the butter on med-high speed until creamy. Add the powdered sugar, cocoa powder, heavy cream, and vanilla extract and mix on low speed until combined (about 30 seconds). Then increase the speed to high and beat for another 1-2 minutes until light and creamy.

Assemble The Cake
Once the cake layers are completely cool and your buttercream has been made, it’s time to assemble and decorate your cake.
First, if needed, use a serrated knife to level off the tops of each cake layer to create a flat surface. Place one cake layer on a cake stand or plate and evenly cover it with chocolate buttercream (I like to use my offset spatula for this part). Place the next cake layer on top and repeat until each layer is frosted.
Next, give the entire cake a crumb coat by spreading a thin layer of buttercream around the sides and top of the cake. Place the cake in the refrigerator for 10 minutes.
Finally, remove the cake from the refrigerator and finish frosting with the remaining buttercream. Cover the sides and top of the cake again until frosted to your desire (use a cake scraper for a smooth finish if desired).
Expert Baking Tips
- Cake Pans: For this recipe, I used three 6-inch cake pans, but you could also use two 8-inch or two 9-inch cake pans (the baking time may be different). Prepare each cake pan by lining them with parchment paper and then non-stick spray.
- Measuring Flour: To help ensure you don’t add extra flour, follow these three simple steps: 1) Fluff up the flour using a fork. 2) Spoon the flour into your measuring cup. 3) Scrape a knife across the top of the measuring cup to level out the flour.
- Crumb Coat: This is where we add a thin layer of frosting on the cake in order to catch the crumbs and keeps them secure. You’ll want to chill the cake in the refrigerator for 10 minutes after the crumb coat has been put on before the final frosting layer.
- Make-Ahead Instructions: This cake recipe is great to make ahead of time. Simply bake the cake layers the day before, wrap them in plastic wrap, and leave them on the counter at room temperature overnight. Frost and decorate the next day.
Recipe FAQs
For this recipe I used Hershey's natural unsweetened cocoa powder.
I used three 6-inch cake pans, but you could also use two 8-inch or two 9-inch cake pans.
Wrap each individual cake slice in plastic wrap before placing it into the refrigerator. This method will help the cake not dry out too quickly. You can keep the cake in the refrigerator for up to 5 days.
Yes you can. Simply bake the cake layers the day before, wrap them in plastic wrap, and leave them on the counter at room temperature overnight. Frost and decorate the next day.

If you made this recipe, please leave a comment and star rating below. I love hearing from you! Also, please tag me on Instagram and check out my Pinterest for even more recipe ideas.
It brings me so much joy to see you make my recipes. 🙂
Happy Baking!
More Cake Recipes
📖 Recipe
Amazing Chocolate Cake
Equipment
- Three 6-Inch Cake Pans
- Mixing Bowls
- Whisk
Ingredients:
Chocolate Cake
- 1 ¾ cups all-purpose flour
- ¾ cup cocoa powder, sifted
- 1 ½ cups sugar
- 1 teaspoon baking soda
- 1 teaspoon baking powder
- ½ teaspoon salt
- 1 cup warm water
- 1 cup milk
- 2 large eggs
- ⅓ cup vegetable oil (or canola oil)
- 1 ½ teaspoons vanilla extract
Chocolate Buttercream
- 1 ½ cups unsalted butter, room temperature (3 sticks)
- 3 ½ cups powdered sugar
- ¾ cup cocoa powder, sifted
- ¼ cup heavy whipping cream
- 1 teaspoon vanilla extract
Instructions:
- Preheat the oven to 325 degrees and line three 6-inch cake pans, two 8-inch cake pans, or two 9-inch cake pans with parchment paper. Then spray with non-stick spray. Set aside.
Chocolate Cake
- Whisk together the flour, cocoa powder, sugar, baking soda, baking powder, and salt in a large bowl. Set aside.
- In a medium-sized mixing bowl, whisk together the warm water, milk, eggs, vegetable oil, and vanilla extract until combined. Slowly add the wet ingredients into the dry, whisking until a wet batter forms (do not overmix).
- Pour the batter evenly between the prepared cake pans and bake for 32-35 minutes, or until a toothpick inserted into the middle of the cakes come out clean. Allow the cakes to cool in the pans for 5 minutes then carefully remove them from the pans and cool on a wire rack. Let the cakes cool completely before frosting.
Chocolate Buttercream
- In the bowl of an electric stand mixer with the paddle attachment, beat the butter on med-high speed until creamy (about 1-2 minutes). Add the powdered sugar, cocoa powder, heavy cream, and vanilla extract and mix on low speed until combined (about 30 seconds). Then increase the speed to high and beat for another 1-2 minutes (frosting should be light and creamy).
Assemble
- If needed, use a serrated knife to level off the tops of each cake layer to create a flat surface. Place one cake layer on a cake stand or plate and evenly cover it with chocolate buttercream (I like to use my offset spatula for this part). Place the next cake layer on top and repeat until each layer is frosted.
- Give the entire cake a crumb coat (see note below) by spreading a thin layer of buttercream around the sides and top of the cake. Place the entire cake in the refrigerator for 10 minutes.
Notes:
Nutrition
This recipe was originally published in June of 2020, but was updated on May 12, 2021 with newer content and fresh pictures


I can attest this is the best chocolate cake I’ve had! Thank you for your amazing recipes!
This looks so yummy! I’m definitely trying it.
Thanks!:)
This cake looks so delicious! I love how simple it is to make too x
Thanks Kat! It really is simple 🙂