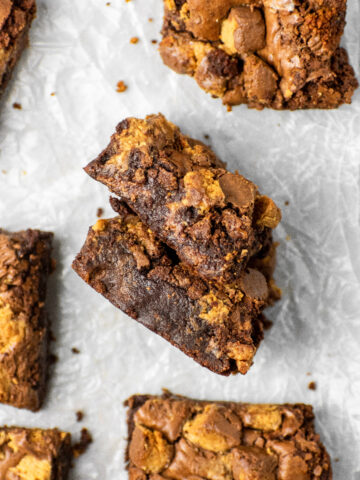
These spider web brownies are the perfect spooky treats to bake this Halloween. They are dark chocolate brownies that are made with both melted chocolate and cocoa powder, so they are super chocolatey and fudgy! The best part? They're made in one bowl and require just 10 minutes of prep.

Why You'll Love These Halloween Brownies
- Dark chocolate flavor. I used my highly rated dark chocolate brownie recipe as inspiration for this spooky dessert. The dark chocolate adds a deep and rich flavor!
- Fun & easy to make. Any dessert that can be made in just one bowl is already going to be a favorite of mine. Plus, the cute spider web design on top is simple to make using melted white chocolate.
- Ooey gooey & fudgy texture. The combination of both melted chocolate and cocoa powder creates a decadent and ultra fudgy brownie.
- Perfect for spooky season. Whether you're looking for a simple treat to make with your kids for Halloween or need something for your Halloween party, these spiderweb brownies are always a hit!
Along with these brownies, I also recommend these Halloween funfetti cupcakes and Hocus Pocus cookies for Halloween.
Jump to:
Before I became a confident home baker, boxed brownies were the only desserts I knew how to make!
But now, I enjoy baking so many fun desserts, including this fool-proof salted caramel sauce and my fall-favorite pumpkin spice bars.
Homemade brownies are truly so easy to make at home without needing to start with a boxed mix. I also have these triple chocolate brownies and mint chocolate brownies you'll love as well.
Ingredients For Easy Spiderweb Brownies

- Chocolate: I used a bittersweet chocolate bar, but you could also use semi-sweet or milk chocolate.
- Eggs: A combination of two large eggs and one egg yolk at room temperature are needed. That extra yolk helps to make the brownies chewy and thick.
- Oil: Just a little bit of vegetable oil added to the batter will help to intensify the chocolate flavor, along with adding extra fudginess.
- Cocoa Powder: I used Hershey's 100% Cacao Natural Unsweetened cocoa powder.
- White Chocolate: I used a white chocolate Ghirardelli bar, but you could also use white chocolate chips if that's all you have.
See the recipe card for the full ingredients list and the exact amounts.
How To Make Spiderweb Brownies

Step 1: In a microwaveable-safe bowl, melt the butter and chopped chocolate in 20-second intervals, stirring well after every 20 seconds until melted and smooth.

Step 2: In a large bowl, whisk together the white sugar, eggs, and egg yolk for 3 minutes.

Step 3: Then whisk in the oil, vanilla extract, and melted chocolate mixture, just until combined.

Step 4: Gently fold in the cocoa powder, all-purpose flour, and salt using a rubber spatula.

Step 5: Scrape the batter into the prepared pan and bake for 20-25 minutes, or just until the edges are set and the middle of the brownies no longer jiggle.
How To Draw A Spiderweb On Brownies
Once the brownies have cooled, place the melted white chocolate in a plastic sandwich bag and cut a small hole in the corner of the bag.
Starting in the center, pipe a small circle and work your way out to the edge of the brownie until you have three circles.
Use a wooden pick (you could also use a table knife) to drag the chocolate from the center of the spiral to the edge of the brownie.
Do this several times until your brownie looks like a spider web.


Storage Tips
Keep any leftover brownies in an airtight container on the counter for up to 5 days.
Professional Home Baking Tips
- Baking Pan: Line your 8x8-inch baking pan with parchment paper, creating "handles" that hang over the sides. Then grease your pan with non-stick spray. This makes extracting the brownies once they have cooled extremely easy.
- Cocoa Powder: In order to have an intense chocolate flavor, this recipe uses more cocoa powder than flour.
- Folding: This means we carefully combine our ingredients without stirring or beating. We do this with a silicone spatula until the ingredients are just combined with each other, “folding” everything together.
- Cooling: To easily cut and serve the brownies, allow them to cool for at least one hour. I like to use a dough scraper to get smooth and even cuts.
- Decorating: I highly suggest you use a piping bag or a plastic baggie to pipe the melted chocolate onto the brownies.

Recipe FAQs
To make things even easier, you can certainly buy store-bought brownies. But I highly recommend you make your own. They're so good!
I like to add an extra egg yolk to my brownies because it makes them more fudgy in texture. Also, adding a melted chocolate bar to the brownie batter makes them super chocolatey and fudgy.
Yes you can. I recommend doubling the recipe so your brownies still turn out thick.
More Halloween Recipes


If you made this recipe, please leave a comment and star rating below. I love hearing from you! Also, please tag me on Instagram and check out my Pinterest for even more recipe ideas.
It brings me so much joy to see you make my recipes. 🙂
Happy Baking!
📖 Recipe

Spider Web Brownies
Equipment
- 8x8 inch baking pan
- Mixing Bowls
- Whisk
Ingredients:
- ½ cup unsalted butter
- 4 ounces bittersweet chocolate, chopped
- 1 ¼ cups sugar
- 2 large eggs, room temperature
- 1 egg yolk, room temperature
- ¼ cup vegetable oil (or canola)
- 1 teaspoon vanilla extract
- ¾ cup cocoa powder
- ½ cup all-purpose flour
- ½ teaspoon salt
- 4 ounces white chocolate, chopped
Instructions:
- Preheat the oven to 350 degrees and line an 8x8-inch baking pan with parchment paper, creating "handles" that hang over the sides. Then spray with non-stick spray.
- In a microwaveable-safe medium bowl, melt the butter and chopped bittersweet chocolate in 20-second intervals, stirring well after every 20 seconds until melted and smooth.
- In a large bowl, whisk together the sugar, eggs, and egg yolk for 3 minutes (this step is crucial). Whisk in the vegetable oil, vanilla extract, and melted chocolate, just until combined.
- Gently fold in the cocoa powder, flour, and salt using a rubber spatula.
- Spread the brownie mixture into the prepared pan. Use your rubber spatula to spread out the batter evenly. Bake for 20-25 minutes, just until the edges are set and the middle of the brownies doesn't jiggle. You can also use a toothpick to check the center (the toothpick should come out clean with just a few crumbs).
- Allow the brownies to completely cool (at least 1 hour) before slicing them into bars.
Decorate
- In a small bowl, melt the chopped white chocolate in 20-second intervals, stirring well after every 20 seconds until melted and smooth. Cool completely at room temperature.
- Once cooled, place the melted white chocolate in a piping bag or ziplock bag. Cut a small hole in the corner and decorate each brownie one-by-one.
- Start in the center of one brownie and pipe a circle. Make a total of three circles, starting in the center and working your way out to the edge. Use a toothpick to drag the white chocolate from the center of the spiral to to the edge of the brownie. Do this several times until your brownie looks like a spider web.
- Repeat with the rest of the brownies until they are all decorated. Keep any leftover brownies in an airtight container on the counter for up to 5 days.


My son loves to make these brownies the week of Halloween!